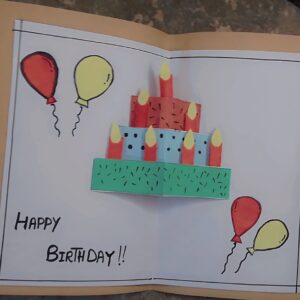
DIY Last Minute Birthday Banner

DIY Last Minute Birthday Banner
A handcrafted touch adds something extra to birthday festivities. This simple birthday banner is not only fun and festive, but it is also quite easy to construct. Create a unique birthday banner for friends or family for their next yearly celebration, and they will undoubtedly feel the love! The banner can also be kept by the guest of honor as a birthday memory.
When arranging your birthday celebration, keep the theme in mind so that the banner looks appropriate for the occasion. You may change the colors, paper patterns, flag forms, and even the style of your alphabet. There are no sophisticated cutting equipment needed, so you can construct this project with only the stuff you already have in your supply cupboard, plus paper, stickers, and embellishments.
for previous article click on link below
https://affanartandcraft.info/how-to-make-a-paper-pinwheel/
Gather materials to create a birthday banner.
Lovely really.
What You Will Need:
Equipment / Tools
Glue sticks
scissors or a paper cutter.
Pencil
Ruler
Hole Punch
Materials
Single color card stock
Patterned paper or cardstock in a complimentary color
Letter stickers or black markers
Cotton cord or string.
Tassels, curled ribbon, and beads (optional)

Instructions
Cut the cardstock.
Begin by cutting your cardstock. If you’re using regular 8 1/2-inch by 11-inch sheets of paper, simply cut them in quarters. Using your ruler, make your first cut at the center of the long end, dividing the sheet in two. Now cut both of the sheets in half, resulting in four quarters. Each of these halves will measure 4 1/4 inch by 5 1/2″.
Tip
If you want to spell Happy Birthday on your banner, you’ll need 13 pieces for each letter. If you want to personalize it with someone’s name, create enough sheets to have one for each letter of the name.

Cut cardstock to make a birthday banner.
Cut the patterned paper.
Cut the paper with patterns to serve as an additional color and design for each banner flag. Cut pieces of patterned paper to 4 1/4 inch by 2 inches.
Tip
As previously stated, you will require 13 of these pattern paper strips for the initials of a happy birthday banners, or more if you are using a name.
Glue the Pattern.
Apply glue to the back of the paper pattern with a glue stick. Glue the pattern paper to one end of a simple sheet of solid colored card stock, ensuring all sides are aligned. Press hard along all sides to ensure security.

How to Create Flags for a The birthday Banner
Letter & Punch
Put one letter on every flag of the birthday banner, centering the letter and placing the patterned paper at the bottom. Whether you use stickers or a marker, you’ll write a single word of happy birthday on each flag. After applying the letters, punch holes on both edges at the upper corners.
Tip
If you do not have letter stickers, you may just use a black pen to put a word on each flag.
Word and hole punching flag for Homemade birthday banners

String onto the cord.
Cut a few inches long cord. To string the cards, beginning with the “H” and put the cord into the left hole of from front to the back, and then in via the hole on the opposite side, from the back to the front. Continue in this way with all of the letters in succession.
Tip
You can connect all of the characters and phrases with one lengthy cable. Alternatively, for greater freedom when displaying your banner, attach each word on its own string so you may hang them up.

How to create a birthday banner.
Hang It Up.
Our banner is prepared to go. Hang cables up straight on the wall, or connect them to ornamental hooks (like the gold ones above), and let the birthday celebrations begin!sepa


Post Comment