DIY Clay bunny
DIY Clay bunny
Air-dry mud is a tomfoolery, flexible medium that allows you to make many wonderful specialties, including charming creatures like a rabbit. Not at all like conventional earth, air-dry mud needn’t bother with to be prepared, settling on it an ideal decision for fledglings or anybody without admittance to a furnace. In this article, we’ll walk you through the most common way of making a charming rabbit with air-dry dirt, utilizing straightforward devices and procedures. Follow these simple tasks, and before long you’ll have your own handmade rabbit to show.
For Previous Article Check Out This Link Below
https://affanartandcraft.info/how-to-make-origami-lucky-star/
Why Pick Air-Dry Mud for Rabbit Figures?
Before we jump into the cycle, how about we examine the reason why air-dry earth is the ideal material for this task. The following are a couple of reasons:
– **No extraordinary gear needed**: Air-dry dirt dries normally without requiring a stove or oven.
– **Simple to work with**: It’s gentler and seriously sympathetic, which is perfect for amateurs.
– **Non-poisonous and safe**: Air-dry dirt is commonly ok for all ages.
– **Customizable**: You can paint, embellish, or stain the last piece once it dries.
Presently, we should bounce into the method involved with making your own air-dry earth rabbit.
Materials Required
Prior to beginning, assemble the accompanying materials:
– Air-dry earth (any brand)
– Chiseling apparatuses (discretionary yet supportive)
– Toothpick or needle for specifying
– Water (to smooth the earth)
– Acrylic paints and paintbrush (for last little details)
– Stain (discretionary for fixing and safeguarding your creation)
Set up Your Workspace
Find a spotless, level surface where you can work. Air-dry mud can be a piece tacky when you first remove it from the bundling, so you should utilize a non-stick mat or a piece of material paper as your work area. Assemble your materials and instruments prior to beginning to guarantee a smooth and continuous making meeting.
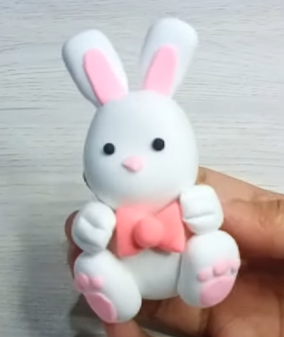
Make the Rabbit’s Body
To begin molding your rabbit, take a little lump of air-dry dirt and roll it into a smooth ball utilizing the centers of your hands. This ball will frame the rabbit’s body. Tenderly lengthen the ball somewhat to make an egg-like shape, which mirrors the round, stout type of a rabbit’s body.
On the off chance that you believe your rabbit should sit, smooth the base section a little to make it more steady once dry. Keep streamlining any breaks or lopsided regions with your fingers, or you can plunge your fingers in water to get a cleaner surface.

Make the Rabbit’s Head and ears ;
Then, take a more modest piece of mud and roll it into a ball to shape the head. The size ought to be proportionate to the body, marginally more modest yet at the same time round and charming. Append the head to the body by tenderly squeezing the two pieces together. In the event that they don’t stick effectively, apply a touch of water where the two pieces meet. Utilize your fingers to mix the dirt at the crease for a consistent change between the head and the body.
Presently it is the right time to give your rabbit its notorious long ears. For this step, take two little bits of dirt and roll them into stretched tear shapes. Level them somewhat to give the ears more aspect. Join the ears to the highest point of the rabbit’s head, tenderly squeezing them down to ensure they stick appropriately. You can bend or curve the ears a little to give your rabbit greater character — maybe one ear can slump over for an extra charming impact.


Add Legs and Feet
To make the rabbit’s legs, take four little bits of dirt, two for the front legs and two for the back legs. Fold each piece into a little chamber. For the front legs, connect two chambers to the front of the body, delicately bending them as though the rabbit is resting its front paws. For the back legs, append the other two chambers rearward of the body, causing them to show up marginally tucked under as though the rabbit is sitting.

Shape the Rabbit’s Face
To rejuvenate your rabbit, utilize a toothpick or needle device to make facial subtleties. Begin by checking two little spaces for the eyes. You can either leave these spaces with no guarantees or supplement minuscule dirt balls to make more conspicuous eyes.
Then, utilize a similar device to cut a little “V” shape where the nose ought to be, just underneath the eyes. Under the nose, define two bended boundaries to frame the rabbit’s mouth. These little subtleties add a great deal of character to your rabbit, so take as much time as necessary.

Make the Rabbit’s Tail
No rabbit is finished without its unique soft tail. Roll a little bundle of dirt for the tail and join it to the rear of the rabbit. You can surface it by softly jabbing it with a toothpick or chiseling instrument to make a cushioned impact. This will give the tail more person, making your rabbit look delicate and cuddly.

Let the Rabbit Dry
After you’re content with the state of your rabbit, put it to the side to dry. The drying time will rely upon the size of your rabbit and the stickiness in your current circumstance, however air-dry mud commonly takes somewhere in the range of 24 to 72 hours to solidify completely. Be patient and permit the rabbit to dry totally prior to continuing on toward the subsequent stage.

Paint and Finish
When the rabbit is totally dry, you can start painting it. Use acrylic paints to add tone and detail to your rabbit. You can paint it a reasonable shade of brown or dim, or get innovative with fun pastel tones. Remember to add subtleties like the pink inside the ears and the dark dabs for the eyes.
To give your rabbit a shiny completion, you can apply a layer of stain once the paint is dry. Stain will likewise assist with safeguarding your creation and make it more sturdy.

Conclusion
Making a rabbit out of air-dry earth is a tomfoolery and remunerating project that anybody can appreciate, paying little heed to expertise level. With only a couple of straightforward instruments and a tad of tolerance, you can create an enchanting rabbit that makes for an ideal beautification or gift. By following these means, you’ll have a charming rabbit to show as well as gain the abilities to try different things with other earth projects from here on out.


Post Comment